 One of the almost inevitable consequences of using Arch Linux for any length of
time is that you will find yourself, if you weren’t already, sucked into the
gravitational vortex of the command line. The drive to continually understand,
refine and customize your setup, your workflow and the tools you use on a daily
basis will surely lead you to the point where you go from having one of those
dinky terminal emulators that scrolls down when you hit F12, to waking
up one day after yet another sleepless night trying to get your head around
C or
Haskell—so that
you can hack your tiling window manager to manage the dozen or so terminals
you constantly have open to your increasingly exacting specifications…
One of the almost inevitable consequences of using Arch Linux for any length of
time is that you will find yourself, if you weren’t already, sucked into the
gravitational vortex of the command line. The drive to continually understand,
refine and customize your setup, your workflow and the tools you use on a daily
basis will surely lead you to the point where you go from having one of those
dinky terminal emulators that scrolls down when you hit F12, to waking
up one day after yet another sleepless night trying to get your head around
C or
Haskell—so that
you can hack your tiling window manager to manage the dozen or so terminals
you constantly have open to your increasingly exacting specifications…
Once you resign yourself to this inevitability, it is a natural progression to
invest some time in setting up your terminal so that it is a pleasant, productive
environment. The first step is to choose your terminal emulator. After playing
with a few, I have settled on
rxvt-unicode.
Urxvt has a number of nice features, principally the ability to run in daemon
mode and, when combined with Bert Münnich’s
urxvt-perls extension,
to be able to interact with text and URLs
with the keyboard.
I have also, over the last two or three months, been intermittently using
termite; the VTE-based
terminal developed by
Daniel Micay and
Simon Gomizelj.
The next step is to select a colour scheme that, after long hours of peering at
the screen, won’t leave you with the eyesight of a mediæval monk. I have settled
on a dark scheme that is relatively low contrast, so works well in natural and
artificial light.1 Combine this with a
custom Vim colourscheme
for syntax highlighting, and you have the base for a consistent aesthetic
experience in your terms.
The cornucopia of choice that is GNU/Linux means that in addition to choosing
your font, you also can choose how it is rendered. I use the
infinality patchset,
but if you are looking for a pre-rolled version I can highly recommend
bohoomil’s
infinality bundle.
The final element—and probably the most important—is the actual shell that you
will run in your terminals.
Bash is installed
everywhere (or, more correctly, everywhere that matters), so that is a solid choice.
If you are looking for a lot more power and flexibility, then you want
Zsh (with the
syntax highlights
plugin).
If, on the other hand, you are the sort of person with tribal piercings
and a fixie, you might want to look at
tcsh, or even
csh2.
Customizing your shell can, in this context, be extended to practically Escheresque
extremes. The prompt, particularly in Zsh, can print relevant information,
helpfully colour coded; but it can also metastasize into a bloated ratmangle of
unicode, complete with git branches, the weather in four different timezones and
random fortunes.
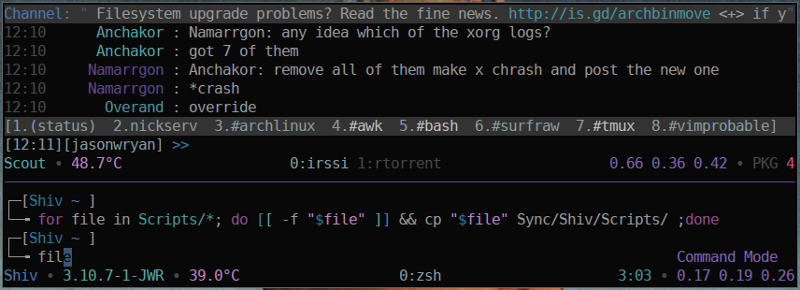
If, through some inexplicable turn of events, you find yourself staring at
something like this, it is time to seek help. Urgently.
For Zsh, I have the hostname (to avoid confusion when SSH'ing between machines,
the current working directory and, if the exit status is anything other than 0
for the last command, that status is appended.
There is one other important choice to make in your shell: to run it in emacs
mode (the default) or vi-mode. This decision says as much about your competence
as it does about your overall contribution to the gene pool, so consider it carefully.
I have previously expressed my
preference for vi-mode,
and using Zsh (which doesn’t use readline) has just entrenched that view for me.
Putting it all together, you end up with an interface that is as attractive to
work with as it is powerful. You have syntax highlighting, command completion
(and with Zsh, impressive correction), coloured URLs that
can be activated with the keyboard, the ability to copy and paste between
terminals and into documents or browsers, configurable keybinds, aliases and
functions limited only by your imagination and the threshold of your indolence.
One final recommendation: consider using a terminal multiplexer like tmux to
manage your terminal sessions. I have posted quite a bit about it
in the past and it
continues to be a mainstay of my working environment. The
Arch Wiki, naturally,
has some very detailed pages on each and every aspect of using the terminal.
All of my configs are available in my bitbucket repositories:
bitbucket.jasonwryan.com.
Notes
- My dark colour scheme is in my
bitbucket repo.
- Then again…
 I posted a couple of weeks ago about
compiling a custom kernel
using modprobed_db
and at the time I talked about automating the process, essentially so that every
kernel update, be it the standard Arch kernel or the stripped down custom one,
would be a simple, streamlined process. I updated that post with
a PKGBUILD,
which was the first step. This completes that process.
I posted a couple of weeks ago about
compiling a custom kernel
using modprobed_db
and at the time I talked about automating the process, essentially so that every
kernel update, be it the standard Arch kernel or the stripped down custom one,
would be a simple, streamlined process. I updated that post with
a PKGBUILD,
which was the first step. This completes that process. While chasing edits on the Arch Wiki a couple of weeks ago, I stumbled upon
this page:
While chasing edits on the Arch Wiki a couple of weeks ago, I stumbled upon
this page: