After much procrastination, I finally got around to moving the last of my machines to Arch Linux: my home desktop, which has been running Ubuntu since the end of 2007. I’d like to share a few thoughts about why I finally walked away from Ubuntu, but I’ll save that for another long post.
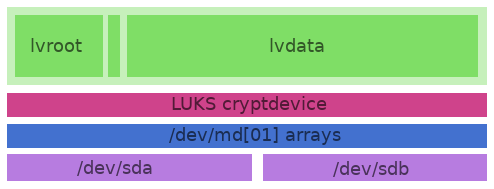
Anyway, the setup I decided on was reasonably straightforward: two 1TB drives comprising two Raid1 devices, one for a small (150Mb) /boot and the other holding three logical volumes in a LUKS crypt. This way, I have the flexibility to grow the volumes as needed, and only require thesingle passphrase at boot to unlock the enclosed partitions: /root, swap and /home.
Almost all of the information here has been gleaned gratefully from other sources; principally the Arch Wiki entries on LUKS and LVM and this helpful blog post. This post (and the next) are notes to remind me how I got here and, in the follow-up, what I need to do to restore this build…
First up, prepare the two hard drives. This took roughly ~90 hours for the 1TB drives, so allow some time:
1
| |
Once the drives are scrubbed (read the Arch Wiki on why that is
necessary), you can move to the actual installation business. I used a
256Mb thumb drive with the most recent x86_64 netinstall image burned
to it. Boot into the live environment and set up the initial partitions
using cfdisk:
1
| |
I created a 150Mb partition for /boot - marked
with the boot flag, and then partitoned the rest of the drive. Both partitons
should be primary and be FSType linux_raid (the FD option). Write the
partition tabel toa file and then import it to the second drive so both are exactly the
same:
1 2 | |
Now, set up the Raid arrays. Start by loading the required modules and then create the two arrays. The metadata flag is important: if you are using legacy grub, as I did, you must use the 0.90 type or your MBR will get overwritten:
1 2 3 4 | |
NOTE: I have split some of the lines of code in this post to ensure they remain readable…
At this point, you can switch to another TTY to watch the disks sync—again, this could take some time, depending on the size of the drives.
1
| |
Check that it all went to plan…
1
| |
Once the drives are synched and pronounced clean, it it time to encrypt the second Raid device, dev/md1. You can’t encrypt the array that contains /boot, but having it duplicated in a Raid array means that, ifone drive goes down, you can still boot the other.
Load the module for encryption, and then set it up:
1 2 3 | |
Now, open the encrypted device to create the logical volumes:
1
| |
The three next steps create, in this order, the physical volume (the container, if you will), the group and then the individual volumes contained in the group. Choose simple, memorable names and do not hypenate them. The {pv,vg,lv}display commands print out the details of the devices once created.
1 2 3 4 5 6 7 8 9 10 | |
It should be pointed out that the Arch Installer Framework supports LUKS and LVM, so you can accomplish these last two steps from within the installer. I tried both and I found that I had a little more control doing it manually, but YMMV.
At this point, you are ready to enter the installer and complete the install. Run /arch/setup and move through the early setup until you reach the ‘Prepare Hard Drives’ section. Select option 3, ‘Configure block devices, mountpoints and filesystems’. Make sure that the only “raw” device that you configure is /dev/md0, your /boot partition. Otherwise, you are configuring the logical volumes, not the devices they are built on.
After succesfully setting up the drives, install the base packages and
then, once that is complete, switch TTYs and update your Raid
configuration prior to configuring your system. This means that when
your initrd is regenerated, it will inlcude the correct Raid
information:
1
| |
When you are done, move to configure your system and make sure to add the relevant details to both your /etc/rc.conf and your /etc/mkinitcpio.conf. In the former:
1 2 | |
and in /etc/mkinitcpio.conf:
1 2 | |
That is the straightforward part of the install over. The final step is a little more tricky: installing a bootloader. My experience, and I tried a number of times using different approaches, is that this won’t work. The installer doesn’t seem to like the Raid setup, so it complains about it:
1
| |
It’s not all bad, as this is the final hurdle and it is not a particularly high one.
The important step is to ensure that your /boot/grub/menu.lst is setup correctly. Given the names I chose above for my devices, mine looks like this:
1 2 3 4 5 6 7 8 9 10 11 12 13 | |
Once it is all setup, simply exit the installer. At this point, you have a perfectly secure, redundant, new Arch Linux install that you can’t boot into. You have two choices; chroot in and manually install grub now, or reboot and do it then. I opted for the latter as it would be more like a recovery mission—and I wanted to make sure that I was capable enough to manage that before committing all of my backed-up data to the machine.
I’ll post the details of the relatively straightforward steps required to chroot into the system and install grub on both hard drives in a couple of days.
Notes
The name
cryptdiskis arbitrary - just make it memorable and use it consistently…I am not sure how necessary it is to have the Raid modules included here, given they are explicitly called in /etc/rc.conf, but caution is warranted. UPDATED 12/4/12 as per the mkinitcpio article on the Wiki the
mdadm_udevhook is preferred over the plainmdadmhook in your /etc/mkinitcpio.conf.